Tuesday, August 31, 2010

Making Baked or Grilled Tofu

I have had a ton of questions about this process. I make this at least once a month and I can't believe it has taken me so long to do a post on this.

It took me quite a bit of time to get pretty good at cooking tofu. At first it was terrible. The taste was bland. It was a bad texture, or it would just fall apart in the pan. Now I feel like I'm fairly good at it. And I get better each time.

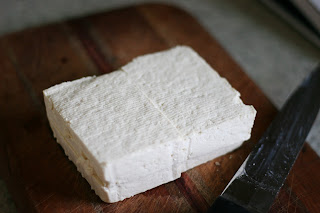
My biggest tip for cooking with tofu is to press it which will release all of the water (or tofu blood as Seth would say). When you release that water you allow for your marinade or whatnot to come in and flavor it.

I'm going to take you through, step by step, the making of grilled Asian tofu. One of my favorites.

First off, when grilling always use extra firm tofu.


This is the pressing process. Take the block of tofu out of the package and dump the water that it was in. Wrap the block in a clean kitchen towel, put it on a plate, and put something heavy on top of it. I always use the top to my panini pan. You could use another pan, a plate with something on it, etc. The kitchen towel will absorb all of the water in the tofu. Let this sit in the fridge for a half a day or so. (if I'm making it during the week I will put in the fridge just like this and then marinate it when I get home from work...8 hours later)


Here is the marinade for the tofu. I have adapted this from Veganomicon. 3 T soy sauce, 1 T sesame oil (god that is good stuff), 1 T rice vinegar, 2 t "cock sauce"...that red hot chili sauce that is in Thai restaurants, 1 T grated ginger, 2-3 smashed garlic cloves.


I always slice my tofu in the same way. I don't know why. I just like it this way.

First down the middle.


Then into four.


Then into triangles. This will give you 8 pieces. This is enough for just me and Seth but it might feed three in your family.


Let it sit in the fridge for at least an hour if not more. Flip or shake half way through marinating.


Grill on medium high heat (or you can bake it in the oven) for 5 or so minutes on each side.


Damn. That is goooooood.

Sunday, August 29, 2010

No Bakes

No bake cookies. So simple but not really. It took me a long time to make a batch of these and have them come out right. I learned that you must use real butter. Not margarine. And here is the trickiest part; if you boil the mixture too long they become crumbly and dry. If you don't allow it to boil long enough they will not set up. I've learned that 2 minutes is about right. NOT under 2. Another tip; a boil means a full boil. Not a few bubbles. Start counting when it is really going.


No Bake Cookies
Source: I think Grammy Bossche
Yield: 2 dozen or so

2 cups sugar
1/2 cup milk
1/4 cup cocoa powder
1 stick butter
3 T peanut butter
3 cups quick oats
1 t vanilla

Combine the sugar, milk, cocoa, and butter in a sauce pan. Bring to a boil and cook for about 2 minutes.

Remove from the stove and stir in the rest of the ingredients. Drop by spoonful onto parchment or silpat and allow to set.

Thursday, August 26, 2010

Strawberry Shortcake

This is a dessert that my husband will eat!! My father used to make this hot milk cake when we were kids and it is the perfect base for a shortcake. It is low fat, sweet, and luscious. Oh, and really easy to whip up. I top it with strawberries and fat free cool whip for Seth. I like mine with fresh whipped cream of course!

Top yours with blueberries, raspberries, blackberries, or just eat it plain!

Hot Milk Cake
Source: Better Homes and Garden
Yield: about 16 servings

1 cup all-purpose flour
1 teaspoon baking powder
2 eggs
1 cup sugar
1/2 cup milk
2 tablespoons butter or margarine

Grease a 9x9x2-inch baking pan; set pan aside. Stir together flour and baking powder; set aside.

In a mixing bowl beat eggs with an electric mixer on high speed about 4 minutes or until thick. Gradually add sugar, beating on medium speed for 4 to 5 minutes or until light and fluffy. Add the dry mixture; beat on low to medium speed just until combined.

In a small saucepan heat and stir milk and butter until butter melts; add to batter, beating until combined. Pour batter into the prepared pan.

Bake in a 350 degree F oven for 20 to 25 minutes or until a wooden toothpick comes out clean. Cool cake in pan on a wire rack. Makes 9 servings.

Tuesday, August 24, 2010

Vegan Banana Bread

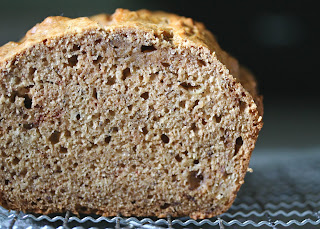
I've shared with you my banana bread recipe. I do love that recipe but I've found another that I will be making for my family. I found this recipe in Veganomicon and it is a much less guilt banana bread. Still very tasty. Very moist. Great with a smear of peanut butter.


Vegan Banana Bread
Source: Veganomicon
Yield: One Loaf

2-3 very ripe bananas
1/4 cup applesauce
1/4 cup canola oil
1/2 cup sugar
2 tablespoons molasses
1 cup all-purpose flour
1 cup whole wheat flour
3/4 teaspoon baking soda
1 teaspoon ground cinnamon
1/4 teaspoon ground nutmeg
1/2 teaspoon salt

Preheat the oven to 350 degrees F. Lightly grease a 9 x 5-inch loaf pan.

In a large mixing bowl, mash the bananas really well. Add the sugar, applesauce, oil, and molasses, and whisk briskly to incorporate.

Sift in the flour, baking soda, spices, and salt. Use a wooden spoon to mix until the wet and dry ingredients are just combined. If you're using chocolate chips or nuts, fold them in here.

Transfer the batter to the prepared pan and bake for 45 to 50 minutes (it took 50 for me). The top should be lightly browned and a knife inserted through the center should come out clean.

Remove from the oven and let cool!

Monday, August 23, 2010

Chocolate Peanut Butter Peanut Butter Cup Ice Cream

Long name. Amazing results. Whose commercial is that?? I can't remember but as I was typing the title for this post I thought of that commercial.

This is chocolate ice cream. Plus peanut butter. Plus peanut butter cups. You heard me. This was amazing.

I find no reason to buy ice cream when you can make it at home. Some of the stuff in the store is cheaper but the quality of homemade ice cream is supreme. Plus you know what is in there!

I wish I had a big bowl of this right now.

Chocolate Peanut Butter Peanut Butter Cup Ice Cream
Source: Adapted from Joelens Blog
Yield: 8 or so servings? but I'm pregnant so it served me like twice. Ha!

2 cups half & half
1/4 cup unsweetened cocoa powder
1/2 cup granulated sugar
pinch of salt
1/2 cup smooth peanut butter
1/2 cup peanut butter cups, frozen and chopped

In a large pan, whisk to combine the half and half, cocoa powder, sugar and salt. Heat the mixture, whisking frequently, until it comes to a full, rolling boil and begins to foam up. Remove the pan from the heat and add the peanut butter, whisking to blend thoroughly.

Refrigerate the mixture to chill thoroughly, then freeze it in your ice cream maker according to the manufacturer’s instructions. After churning, fold in the candies into the ice cream and transfer mixture into a freezer safe container. Freeze overnight to ripen before serving.

Sunday, August 22, 2010

Lemon Pull Apart Coffee Cake

I knew when I saw this coffee cake that I had to make it. The idea of the yeasty pull apart goodness had me hooked and I'm so glad I made it.

I brought this in to share with my coworkers because if left at home I would have eaten the entire thing. Everyone really enjoyed it but my father, who is a bit old school, was confused why it was called a coffee cake. I think he was expecting something more cakey, less bread like. This is almost like a cinnamon roll made into a loaf...minus cinnamon...plus lemon.

Now, I know that the recipe look daunting. It really isn't that bad. Like any yeast bread you have to let it rise so plan ahead. I promise it is worth it!


Lemon Pull Apart Coffee Cake
Source: 17 and baking
Yield: 10ish servings

Sweet Yeast Dough
About 2 3/4 cups (12 1/4 ounces) all-purpose flour
1/4 cup (1 3/4 ounces) granulated sugar
2 1/4 teaspoons (1 envelope) instant yeast
1/2 teaspoon salt
1/3 cup (2 1/2 fluid ounces) whole milk
2 ounces unsalted butter
1/4 cup (2 fluid ounces) water
1 1/2 teaspoons pure vanilla extract
2 large eggs, at room temperature

Lemon Sugar Filling
1/2 cup (3 1/2 ounces) granulated sugar
3 tablespoons finely grated lemon zest (3 lemons)
1 tablespoon finely grated orange zest
2 ounces unsalted butter, melted

Tangy Cream Cheese Icing
3 ounces cream cheese, softened
1/3 cup (1 1/4 ounces) powdered sugar
1 tablespoon whole milk
1 tablespoon fresh lemon juice

Make the Sweet Yeast Dough
Mix two cups flour, the sugar, yeast, and salt in a medium bowl with a rubber spatula. Meanwhile, in a small saucepan or in the microwave, combine the milk and the butter and heat until the butter is melted. Remove from the heat, add the water, and let rest a minute until just warm (120 to 130°F) Stir in the vanilla extract.

Pour the milk mixture over the flour-yeast mixture and, using a rubber spatula, mix until the dry ingredients are evenly moistened. Attach the bowl to the mixer, and fit the mixer with the paddle attachment. With the mixer on low speed, add the eggs, one at a time, mixing after each addition just until incorporated. Stop the mixer, add 1/2 cup of the remaining flour, and resume mixing on low speed until the dough is smooth, 30 to 45 seconds. Add 2 more tablespoons flour and mix on medium speed until the dough is smooth, soft, and slightly sticky, about 45 seconds.

Lightly flour a work surface and knead the dough gently until smooth and no longer sticky, about one minute. Add an additional 1-2 tablespoons of flour only if the dough is too sticky to work with. Place the dough in a large bowl, cover it with plastic wrap, and let it rise in a warm place (about 70°F) for 45-60 minutes or until doubled in size. An indentation made with your finger should keep its shape.

Meanwhile, make the lemon sugar filling. Mix the sugar, lemon zest, and orange zest. It’ll draw out the citrus oils and make the sugar sandy and fragrant.

Center a rack in the oven and preheat the oven to 350°F. Grease a 9″x5″ loaf pan.

Gently deflate the dough with your hand. Flour a work surface and roll the dough into a 20″ by 12″ rectangle. [She suggests using a ruler and getting this as accurate as possible, for a prettier loaf that will fit better in the pan. I also suggest making sure both sides are floured, so that the dough will be easy to lift up later.] Use a pastry brush to spread the melted butter evenly and liberally over the dough.

Use a pizza cutter to cut the dough crosswise in five strips, each about 12″ by 4″. Sprinkle 1 1/2 tablespoons of the lemon sugar over the first buttered rectangle. Top it with a second rectangle, sprinkling that one with 1 1/2 tablespoons of lemon sugar as well. Continue to top with rectangles and sprinkle, so you have a stack of five 12″ by 4″ rectangles, all buttered and topped with lemon sugar. [She suggests carefully sprinkling the sugar and pressing it in lightly to keep it from falling off.]

Slice this new stack crosswise, through all five layers, into 6 equal rectangles (each should be 4″ by 2″.) Carefully transfer these strips of dough into the loaf pan, cut edges up, side by side. it might be a little roomy, but the bread will rise and expand after baking. Loosely cover the pan with plastic wrap and let the dough rise in a warm place (70 °F [21°C]) until puffy and almost doubled in size, 30 to 50 minutes. When you gently press the dough with your finger, the indentation should stay.

Bake the loaf until the top is golden brown, 30 to 35 minutes. (I baked mine for another 10 or so minutes. It started to brown on the top so I covered it with foil). Transfer to a wire rack and let cool in the pan for 10 to 15 minutes.

Meanwhile, make the cream cheese icing. Beat the cream cheese and powdered sugar in a medium bowl with a wooden spoon until smooth, then add the milk and lemon juice. Stir until creamy and smooth.

The recipe recommends you tilt and rotate the pan while tapping on a table to release the loaf. I just carefully ran a knife around it. Flip the loaf over onto a cooling rack, then flip onto another rack so that it’s right side up. Spread the top of the warm cake with the cream cheese icing, using a pastry brush to fill in all the cracks. [You might want to put a pan or piece of wax paper under to catch any drips.]

Eat warm or at room temperature. You can also cut the cake with a knife, but wait for it to cool if you plan to do so. The cake tastes better on the first day.

Thursday, August 19, 2010

Fresh Tomatoes!

My weekly grocery bill this week was $36. This is one of the many reasons I love this time of year. When it is suppertime I just walk out back, pick a couple tomatoes, a cucumber, a pepper and make a nice little salad.

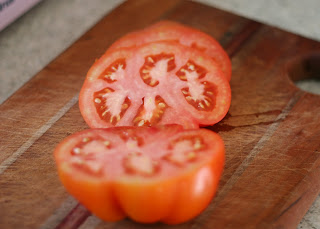
This is the first tomato from the garden. I know it is an heirloom and I believe it is called Brandywine. Beautiful.

This variety of tomato is really meaty which means it makes a great sandwich!

My lunch staple in the summer, cucumber and tomato sandwich. Easy, cheap, and fresh!

Happy harvesting!

Tuesday, August 17, 2010

Smashed Caprese

I made this up on the fly!! I wanted a quick side to go with my veggie and tofu stack and I thought a cold salad would offset the hot veggies nicely. I chose to smash the mozzarella so it was more distributed and easier to eat on bread. This was awesome.

Smashed Caprese Salad
Source: ME!
Yield: 2 servings

1/2 pint cherry or grape tomatoes, halved
1/2 ball of fresh mozzarella
8 basil leaves, sliced into strips
Olive Oil
S&P

Combine the tomatoes and basil, smash the mozzarella in your fingers and sprinkle over the tomatoes. Drizzle with olive oil and season with S&P. Serve as a side salad or on grilled bread.

Thursday, August 12, 2010

Strawberries and Cream Tart

Here is another recipe that I flubbed. I have one tart pan. I just assumed that my tart pan and the tart pan the recipe calls for were the same size. No. Of course not. And when did I realize they weren't the same size? When I was serving the tart and the layer of cream was about a quarter of an inch. Whoops.

Taste wise this was awesome. The cream is terrific, the crust is great, and fresh strawberries are always good. My 4 year old niece even asked if I would save her a piece to have the next day. That is a way to melt any baker's heart!!

Strawberries and Cream Tart
Source: Food Network Magazine
Yield: 8-10 servings

2 tablespoons vegetable oil
1 large egg plus 1 egg yolk
2 tablespoons cold whole milk
1 teaspoon apple cider vinegar
1 1/4 cups all-purpose flour
1/8 teaspoon baking powder
3 tablespoons granulated sugar
1/2 teaspoon salt
6 tablespoons cold unsalted butter, cut into 1/4-inch cubes

For the Filling:
1 teaspoon unflavored gelatin
1/4 cup granulated sugar
1 vanilla bean, split lengthwise and seeds scraped out
1 1/4 cups cold light cream
1 quart strawberries, hulled and cut into 1/2-inch pieces
Confectioners' sugar, for dusting

Make the crust: Whisk the vegetable oil, egg yolk, milk and vinegar in a bowl. Pulse the flour, baking powder, sugar and salt in a food processor to combine; add the butter and pulse until the mixture looks like coarse meal. Add the milk mixture and pulse once or twice, just to moisten the flour.

Transfer the dough to a 9-inch-round tart pan with a removable bottom and pat onto the bottom and up the sides. Cover with plastic wrap and refrigerate until firm, at least 30 minutes. Trim the edges, if necessary.

Preheat the oven to 350 degrees F. Pierce the dough all over with a fork. Line with foil and fill with pie weights or dried beans. Place the pan on a baking sheet and bake 15 minutes. Remove the foil and weights; continue to bake until golden, 10 to 15 more minutes. Beat the whole egg with 1 teaspoon water, then lightly brush over the crust and bake 5 more minutes. Cool completely on a rack.

Meanwhile, make the filling: Sprinkle the gelatin over 1 tablespoon cold water in a bowl and let soften 5 minutes. Put the granulated sugar and vanilla seeds in a saucepan and rub the seeds into the sugar with your fingers. Add 1 cup cream and whisk over medium heat to dissolve the sugar. When the mixture comes to a boil, remove from the heat and whisk in the gelatin mixture. Transfer to a bowl, then set in a larger bowl of ice water and stir with a rubber spatula until the mixture begins to thicken. Add the remaining 1/4 cup cream and stir until thick, about 2 minutes. Pour into the tart shell and refrigerate until set, about 1 hour.

Before serving, top the tart with the strawberries and confectioners' sugar.

Tuesday, August 10, 2010

Veggie and Tofu Stack

The other night I asked Seth what he wanted for supper when he came home from work. He said, "Something light that I can eat a lot of." Erm. OK.

I get it. He wants to be able to get full and be satisfied but not be overloaded with heavy foods or fat (weekly cooking at 179 doesn't contain much fat...because of him.)

I decided on grilled veggies because you can eat a ton of them and not feel bad. Then tofu for protein. I found the recipe for this stack in my binder. Perfect. I made couscous for a carb. And then I made a little smashed caprese salad to put on a slice of sourdough bread. This was a fantastic meal!

Grilled Veggie and Tofu Stack
Source: Bon Appetit
Yield: 4 servings

1/3 cup balsamic vinegar
2 garlic cloves, minced
2/3 cup olive oil
1/3 cup thinly sliced fresh mint leaves
1 12-ounce container extra-firm tofu, cut crosswise into 8 slices, drained on paper towels
1 zucchini, trimmed, cut lengthwise into four 4-inch-long slices
1 red bell pepper, rounded ends trimmed, seeded, cut lengthwise into 4 pieces
1 Japanese eggplant, trimmed, cut lengthwise into four 4-inch-long slices
4 3-inch-diameter portobello or shiitake mushrooms, stems removed
1 small head of radicchio, quartered through root end

Prepare barbecue (medium-high heat). Place vinegar and minced garlic in large bowl. Gradually whisk in olive oil. Stir in sliced mint. Season marinade to taste with salt and pepper.

Working in batches, add tofu to marinade and turn to coat. Transfer tofu to baking sheet and sprinkle with salt and pepper. Add zucchini, bell pepper, eggplant, mushrooms, and radicchio to marinade in bowl and toss to coat.

Place zucchini, pepper, eggplant, and mushrooms on grill. Sprinkle with salt and pepper. Cook until charred and softened, turning occasionally, about 6 minutes. Transfer to baking sheet. Place tofu and radicchio on grill. Cook until tofu is charred and radicchio is charred and wilted, about 2 minutes per side.

Stack tofu and vegetables on plates. Garnish with mint sprigs and serve.

Friday, August 6, 2010

Barley and Bean Salad

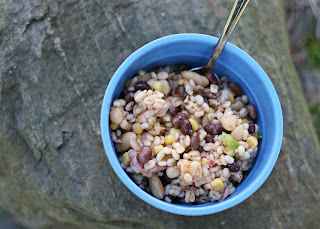
This is an awesome versatile salad. You can use any kind of canned beans that you have on hand. I used black beans and cannelini beans. The original recipe called for kidney beans but I didn't have any. Chickpeas and pinto beans would be nice as well. I love beans.

I brought this salad to a BBQ at my father's house so that Seth would have a salad to eat that he liked. He doesn't like mayo based salads and my family does. I didn't anticipate my family liking this since it is barley and beans. They loved it!! My father went in for seconds!! I was so happy!

Barley and Bean Salad
Source: Erin's Food Files
Yield: 6 servings

1 cup pearl barley
2 cups water
2 cups of canned mixed beans
1 cup fresh corn cut off the cob, or canned corn kernels
1/2 cup red onions, diced
1 red bell pepper, diced

Dressing:
1/3 cup red wine vinegar
2-3 cloves garlic, minced
1 tsp chili powder
1 tsp dried parsley
1 tsp cumin
1/2 tsp kosher salt
1/2 tsp crushed red pepper flakes
1/4 tsp ground black pepper
2/3 cup olive oil

In a large saucepan, bring 2 cups water to boil. Stir in barley and reduce heat to medium-low. Cover and simmer 30-40 minutes or until tender. If using a rice cooker, increase water to 2 1/2 cups. Allow barley to cool.

In a large bowl, combine the cooled barley, beans, corn, red onion and bell pepper. Mix well.

Combine remaining ingredients, whisking in olive oil. Pour over salad and toss well.

Serve at room temperature or chill in fridge for several hours.

If serving chilled, reserve some of the dressing to pour over salad just before serving.

Wednesday, August 4, 2010

Pesto Pasta Salad

I love summery salads. This is one that I make somewhat often. It is very versatile so I add whatever veggies I have on hand at the time. Tomatoes, peppers, olives, onions, cukes, zukes, carrots, etc. The measurements for everything but the oil, water and pesto mix is a guess. I just cook up a bunch of pasta. I especially like to use bow ties for this one. It makes me feel fancy.


Pesto Pasta Salad
Source: ME!
Yield: 4-6 servings

1/2 cup olive oil
1/4 cup water
1 envelope Knorr pesto mix
2 garlic cloves, minced
dash crushed red pepper
1/2 box bow tie pasta
Mixture of veggies

Cook and drain the pasta. Whisk together the oil, water and pesto mix with the garlic and crushed red pepper. Add the pasta and veggies. Toss to coat. Chill.

Monday, August 2, 2010

Basil Mocktini

This is the mocktini that go this all started. The lovely MM raved about this drink and it caught my attention even before I was pregnant! I don't know why I didn't try this one first! I used basil straight from the garden. Delicious. Who would have thought that basil would make such a great drink??

Basil Mocktini
Source: Margarita Mamas: Mocktails for the Mom-to-be
Yield: One awesome drink

6 basil leaves
1 oz lime juice
3 t sugar
5 oz club soda

Muddle the basil and lime juice in a shaker. Add the sugar and club soda, stir, and serve in martini glass. Yummy.